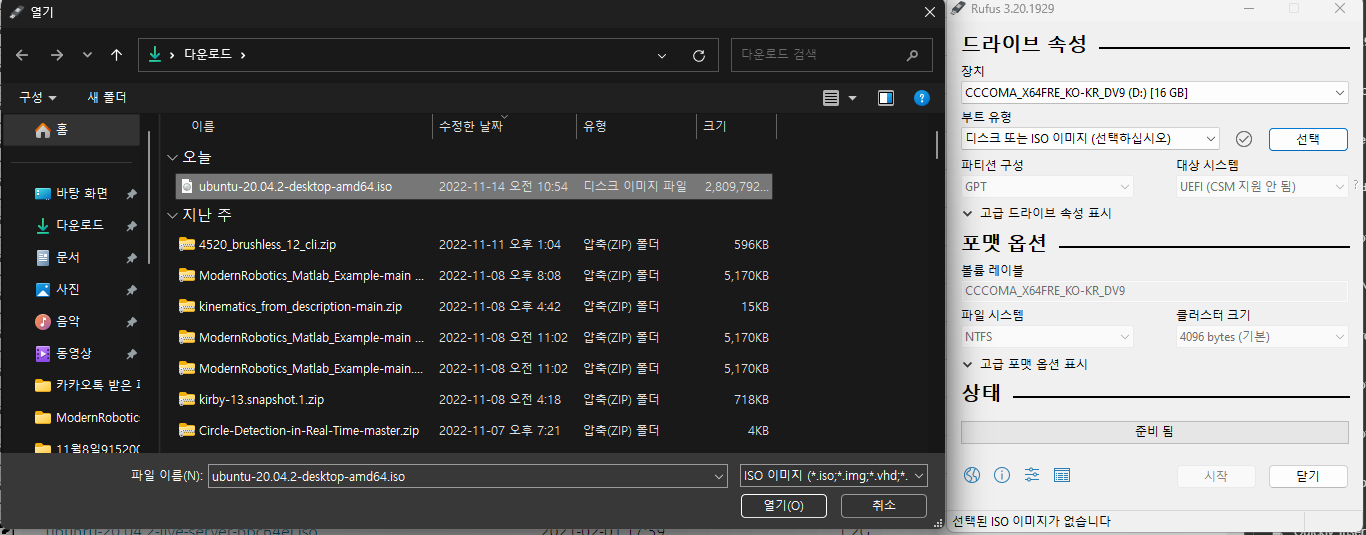
1. Ubuntu 20.04.2 설치
https://old-releases.ubuntu.com/releases/20.04.2/ubuntu-20.04.2-desktop-amd64.iso # 2. Rufus 설치
https://github.com/pbatard/rufus/releases/download/v3.20/rufus-3.20.exe # 3. 부팅USB제작 (8GB이상의 USB) 
4. 재시작 후 Ubuntu 20.04.2 설치진행
5. 기본 라이브러리 설치
sudo apt install build-essential kernel-package libncurses5-dev libelf-dev openssl libssl-dev libtool libltdl-dev git distcc xenomai-system-tools rt-tests libc-dev libc6-dev pkg-config ncurses-dev stress autoconf libncurses-dev flex bison libssl-dev dkms libelf-dev libudev-dev libpci-dev libiberty-dev dwarves
설치 시 중간에 아래와 같은 창이 뜰텐데 install the package maintainer's version 선택 
	mkdir ~/xeno_ws
	cd ~/xeno_ws
	export xeno_home=$PWD

6. Xenomai 3.1.1 다운로드
아래와 같이 Xenomai 3.1.1을 다운로드
	cd $xeno_home
	git config --global http.sslverify false
	git clone https://source.denx.de/Xenomai/xenomai.git
	cd xenomai
	git checkout v3.1.1
	cd ../
7. Linux 5.4.124 커널 다운로드
아래와 같이 Linux 5.4.124 커널을 다운로드
	cd $xeno_home
	wget https://www.kernel.org/pub/linux/kernel/v5.x/linux-5.4.124.tar.gz
	tar -xf linux-5.4.124.tar.gz
	cd linux-5.4.124
	export linux_path=$PWD
8. Xenomai ipipe 다운로드
	cd $linux_path
	wget https://xenomai.org/downloads/ipipe/v5.x/x86/ipipe-core-5.4.124-x86-5.patch
9. Xenomai ipipe patch진행
	cd $linux_path
	../xenomai/scripts/prepare-kernel.sh --arch=x86_64 --ipipe=ipipe-core-5.4.124-x86-5.patch
10. Kernel 빌드 전 상세설정 진행
	cd $linux_path
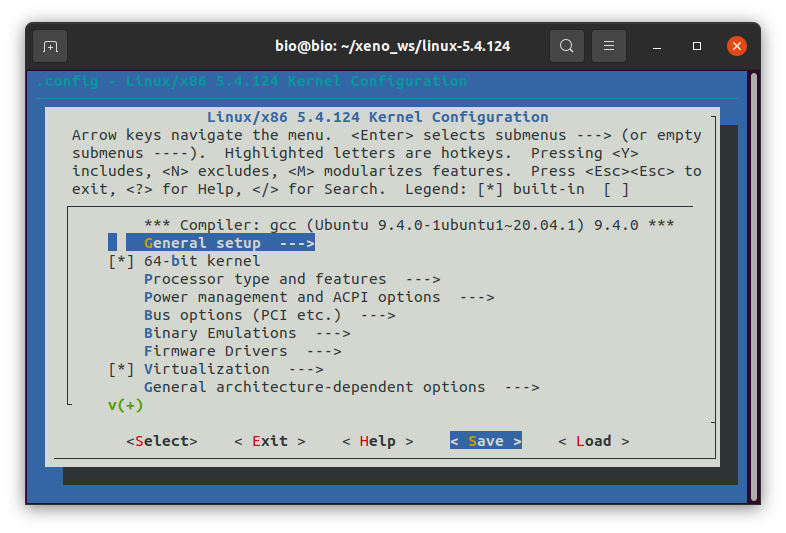
	sudo make menuconfig

General setup
--> Local version - append to kernel release: -xenomai-3.1.1

--> Timers subsystem

	--> High Resolution Timer Support (Enable)

-->  Preemption Model

	--> Preemption Kernel (Low-Latency Desktop)
Pocessor type and features
--> Numa Memory Allocation and Scheduler Support (Disable)

--> Linux guest support (Disable)

--> Processor family

	--> Core 2/newer Xeon

	--> if "`cat /proc/cpuinfo | grep family`" returns 6, set as Generic otherwise

// Xenomai will issue a warning about CONFIG_MIGRATION, disable those in this order

--> Multi-core scheduler support (Enable)

--> CPU core priorities scheduler support (Disable)

--> Timer frequency (1000 Hz)
Power management and ACPI options
--> ACPI (Advanced Configuration and Power Interface) Support (disable)
--> CPU Frequency scaling (disable)
--> CPU Idle --> CPU idle PM support (disable)
Xenomai/cobalt
--> Sizes and static limits
	--> Number of registry slots (512 --> 4096)
	--> Size of system heap (Kb) (512 --> 4096)
	--> Size of private heap (Kb) (64 --> 256)
	--> Size of shared heap (Kb) (64 --> 256)
	--> Maximum number of POSIX timers per process (128 --> 512)
--> Drivers
	--> Real-time IPC drivers
		--> RTIPC protocol family(Enable)
	--> RTnet
		--> RTnet, TCP/IP socket interface (enable)
			--> Protocol stack --> TCP support (enable)
Memory Management options
--> Transparent Hugepage Support (Disable)
--> Contiguous Memory Allocator (Disable)
--> Allow for memory compaction (Disable)
	--> Page Migration (Disable)
Device Drivers
--> Staging drivers
	--> Unisys SPAR driver support (Disable)
--> Network device support(enable)
	--> Ethernet driver support (enable)
	--> # enable ethernet driver w.r.t. each h/w system
Kernel hacking
--> KGDB: kernel debugger (Disable)
EFI error 발생 시 (https://stackoverflow.com/questions/40344484/cant-load-self-compiled-linux-kernel)
Power management and ACPI options --->
[*] ACPI (Advanced Configuration and Power Interface) Support --->
Processor type and features --->
[*] EFI runtime service support
[*] EFI stub support
Firmware Drivers --->
EFI (Extensible Firmware Interface) Support --->
<*> EFI Variable Support via sysfs 설정 저장 
11. 설정 완료 후 빌드 진행(예상소요시간 1시간)
cpu 코어 수에 맞춰서 –J n 설정
	cd $linux_path
	sudo CONCURRENCY_LEVEL=$(nproc) make-kpkg --J 4 --rootcmd fakeroot --initrd kernel_image kernel_headers
12. 빌드 완료 후 생성된 deb파일을 dpkg를 통해 설치
	cd $xeno_home
	sudo dpkg -i linux-headers-5.4.124-xenomai-3.1.1_5.4.124-xenomai-3.1.1-10.00.Custom_amd64.deb linux-image-5.4.124-xenomai-3.1.1_5.4.124-xenomai-3.1.1-10.00.Custom_amd64.deb
13. Allow non-root user
	sudo addgroup xenomai --gid 1234
	sudo addgroup root xenomai
	sudo usermod -a -G xenomai $USER
14. grub File 설정
gedit /etc/default/grub
아래와 같이 수정
	GRUB_DEFAULT="0"
	GRUB_HIDDEN_TIMEOUT="5"
	GRUB_HIDDEN_TIMEOUT_QUIET="true"
	GRUB_DISTRIBUTOR="`lsb_release -i -s 2> /dev/null || echo Debian`"
	GRUB_CMDLINE_LINUX_DEFAULT="quiet splash xenomai.allowed_group=1234"
	GRUB_CMDLINE_LINUX=""
15. grub설정 후 재시작
	sudo update-grub
	sudo reboot
16. 재시작 후 grub창 xenomai선택
Advanced Options for Ubuntu
--> Ubuntu, with Linux 5.4.124-xenomai-3.1.1 # 17. 터미널 창에서 xenomai 커널 확인 ```bash
uname -a ```  # 18. xenomai build ```bash
cd ~/xeno_ws/xenomai
automake --add-missing
autoreconf -i
./configure --with-pic --with-core=cobalt --enable-smp --disable-tls --enable-dlopen-libs --disable-clock-monotonic-raw
sudo make -j4
sudo make install
echo '
### Xenomai
export XENOMAI_ROOT_DIR=/usr/xenomai
export XENOMAI_PATH=/usr/xenomai
export PATH=$PATH:$XENOMAI_PATH/bin:$XENOMAI_PATH/sbin
export PKG_CONFIG_PATH=$PKG_CONFIG_PATH:$XENOMAI_PATH/lib/pkgconfig
export LD_LIBRARY_PATH=$LD_LIBRARY_PATH:$XENOMAI_PATH/lib
export OROCOS_TARGET=xenomai
' >> ~/.bashrc
source ~/.bashrc
sudo chmod -R 777 /dev/rtdm/memdev-private
sudo chmod -R 777 /dev/rtdm/memdev-shared
# If you have a problem that sudo does not recognize the SHARED LIBRARY PATH, type the following command.
cd /etc/ld.so.conf.d/
sudo gedit xenomai.conf
'
### Multiarch support
/usr/xenomai/lib
'
sudo ldconfig -v
# 19. Xenomai Test
```bash
 	cd /usr/xenomai/bin
	sudo ./latency

Fix negative latency issues
You need to be in root sudo -s, then you can set values to the latency calibration variable in nanoseconds:
echo 0 > /proc/xenomai/latency
Now run the latency test
If the minimum latency value is positive,
then get the lowest value from the latency test (ex: 0.088 us)
and write it to the calibration file ( here you have to write 88 ns) :
echo ${my_super_value_in_ns} > /proc/xenomai/latency